

Introduction
Exécuter terraform apply manuellement depuis son poste de travail, c'est acceptable quand on débute. Mais en production, avec une équipe, cette approche devient rapidement un cauchemar : qui a lancé le dernier apply ? Depuis quel état du code ? Les tests ont-ils été exécutés avant ? Les credentials sont-elles sécurisées ? L'automatisation de Terraform via un pipeline CI/CD répond à toutes ces questions.
Dans cet article, nous allons construire ensemble un pipeline CI/CD complet pour Terraform, en couvrant les principaux outils du marché : GitHub Actions, GitLab CI, et les bonnes pratiques transversales. Vous découvrirez comment automatiser les plans sur les Pull Requests, sécuriser les applies sur merge, intégrer des tests de qualité et de sécurité, et mettre en place des gates d'approbation. À la fin de cet article, vous aurez un workflow production-ready à adapter à votre contexte.
Pourquoi Automatiser Terraform ?
Avant de plonger dans l'implémentation technique, comprenons les bénéfices concrets de l'automatisation.
Les Risques du Terraform Manuel
- Dérive de configuration : Chaque développeur a une version différente de Terraform, des providers, ou du code sur son poste.
- Absence de traçabilité : Impossible de savoir qui a appliqué quel changement et quand.
- Secrets exposés : Les credentials cloud traînent dans des fichiers locaux ou des variables d'environnement non protégées.
- Pas de revue de code : Un
terraform applypeut être lancé sans que personne n'ait revu le plan. - Erreurs humaines : Appliquer sur le mauvais environnement, oublier de pull le dernier code, appliquer un state corrompu.
Les Bénéfices du Pipeline CI/CD
- Reproductibilité : Chaque exécution utilise la même version de Terraform et des providers.
- Traçabilité complète : Chaque changement est lié à un commit, une PR, un auteur.
- Revue obligatoire : Le plan est visible dans la PR avant tout apply.
- Tests automatisés : Validation syntaxique, linting, scan de sécurité avant chaque déploiement.
- Gestion sécurisée des secrets : Les credentials sont stockées dans le vault du CI/CD, jamais sur les postes.
Architecture d'un Pipeline CI/CD pour Terraform
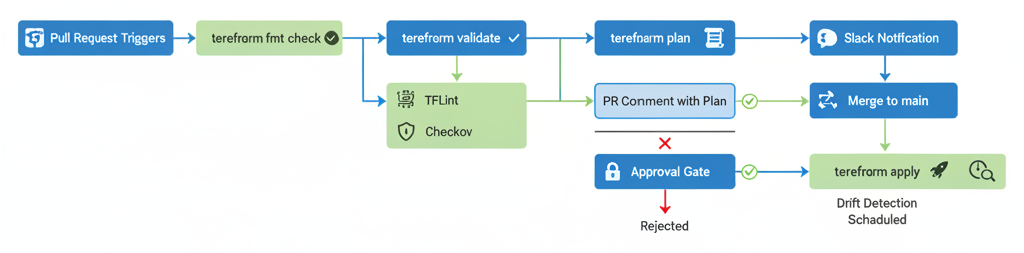
Un pipeline CI/CD pour Terraform suit généralement ce flux :
# Flux typique d'un pipeline Terraform CI/CD
#
# 1. Développeur crée une branche feature
# 2. Développeur pousse ses changements Terraform
# 3. Développeur ouvre une Pull Request
#    └── Le CI déclenche automatiquement :
#        ├── terraform fmt -check (formatage)
#        ├── terraform validate (syntaxe)
#        ├── tflint (linting avancé)
#        ├── checkov / tfsec (sécurité)
#        ├── terraform plan (prévisualisation)
#        └── Le plan est posté en commentaire dans la PR
# 4. L'équipe review la PR et le plan
# 5. Approbation et merge sur main
#    └── Le CD déclenche automatiquement :
#        ├── terraform plan (re-vérification)
#        ├── Gate d'approbation manuelle (optionnel)
#        └── terraform apply (déploiement)
GitHub Actions pour Terraform : Workflow Complet
GitHub Actions est l'outil CI/CD le plus populaire pour les projets hébergés sur GitHub. Voici un workflow complet et production-ready pour Terraform.
Structure du Projet
# Structure recommandée
terraform-infrastructure/
├── .github/
│   └── workflows/
│       ├── terraform-plan.yml      # Déclenché sur PR
│       └── terraform-apply.yml     # Déclenché sur merge main
├── environments/
│   ├── production/
│   │   ├── main.tf
│   │   ├── variables.tf
│   │   ├── outputs.tf
│   │   ├── backend.tf
│   │   └── terraform.tfvars
│   └── staging/
│       ├── main.tf
│       ├── variables.tf
│       ├── outputs.tf
│       ├── backend.tf
│       └── terraform.tfvars
├── modules/
│   ├── networking/
│   ├── compute/
│   └── database/
├── .tflint.hcl
└── .checkov.yml
Workflow de Plan (sur Pull Request)
# .github/workflows/terraform-plan.yml
name: "Terraform Plan"

on:
  pull_request:
    branches: [main]
    paths:
      - 'environments/**'
      - 'modules/**'
      - '.github/workflows/terraform-*.yml'

permissions:
  contents: read
  pull-requests: write

env:
  TF_VERSION: "1.7.0"
  TF_LOG: ""

jobs:
  detect-changes:
    name: "Detect Changed Environments"
    runs-on: ubuntu-latest
    outputs:
      environments: ${{ steps.changes.outputs.environments }}
    steps:
      - uses: actions/checkout@v4

      - name: Detect changed environments
        id: changes
        run: |
          ENVS=$(git diff --name-only origin/main...HEAD | \
            grep '^environments/' | \
            cut -d'/' -f2 | \
            sort -u | \
            jq -R -s -c 'split("\n") | map(select(. != ""))')
          echo "environments=$ENVS" >> $GITHUB_OUTPUT
          echo "Changed environments: $ENVS"

  terraform-plan:
    name: "Plan - ${{ matrix.environment }}"
    needs: detect-changes
    if: needs.detect-changes.outputs.environments != '[]'
    runs-on: ubuntu-latest
    strategy:
      matrix:
        environment: ${{ fromJson(needs.detect-changes.outputs.environments) }}
      fail-fast: false

    steps:
      - name: Checkout
        uses: actions/checkout@v4

      - name: Setup Terraform
        uses: hashicorp/setup-terraform@v3
        with:
          terraform_version: ${{ env.TF_VERSION }}

      - name: Configure AWS Credentials
        uses: aws-actions/configure-aws-credentials@v4
        with:
          role-to-assume: ${{ secrets.AWS_ROLE_ARN }}
          aws-region: eu-west-3

      - name: Terraform Format Check
        id: fmt
        run: terraform fmt -check -recursive
        working-directory: environments/${{ matrix.environment }}
        continue-on-error: true

      - name: Terraform Init
        id: init
        run: terraform init -no-color
        working-directory: environments/${{ matrix.environment }}

      - name: Terraform Validate
        id: validate
        run: terraform validate -no-color
        working-directory: environments/${{ matrix.environment }}

      - name: Setup TFLint
        uses: terraform-linters/setup-tflint@v4
        with:
          tflint_version: latest

      - name: Run TFLint
        id: tflint
        run: |
          tflint --init
          tflint --format compact --no-color
        working-directory: environments/${{ matrix.environment }}
        continue-on-error: true

      - name: Run Checkov Security Scan
        id: checkov
        uses: bridgecrewio/checkov-action@v12
        with:
          directory: environments/${{ matrix.environment }}
          framework: terraform
          output_format: cli
          soft_fail: true
          quiet: true

      - name: Terraform Plan
        id: plan
        run: |
          terraform plan -no-color -out=tfplan \
            -detailed-exitcode 2>&1 | tee plan_output.txt
          echo "exitcode=${PIPESTATUS[0]}" >> $GITHUB_OUTPUT
        working-directory: environments/${{ matrix.environment }}
        continue-on-error: true

      - name: Post Plan to PR
        uses: actions/github-script@v7
        if: github.event_name == 'pull_request'
        with:
          github-token: ${{ secrets.GITHUB_TOKEN }}
          script: |
            const fs = require('fs');
            const planOutput = fs.readFileSync(
              `environments/${{ matrix.environment }}/plan_output.txt`,
              'utf8'
            );

            const maxLength = 60000;
            const truncated = planOutput.length > maxLength
              ? planOutput.substring(0, maxLength) + '\n... (tronqué)'
              : planOutput;

            const body = `### Terraform Plan - \`${{ matrix.environment }}\`

            | Étape | Résultat |
            |-------|----------|
            | Format | \`${{ steps.fmt.outcome }}\` |
            | Init | \`${{ steps.init.outcome }}\` |
            | Validate | \`${{ steps.validate.outcome }}\` |
            | TFLint | \`${{ steps.tflint.outcome }}\` |
            | Plan | \`${{ steps.plan.outcome }}\` |

            Détail du Plan

            \`\`\`terraform
            ${truncated}
            \`\`\`

            `;

            github.rest.issues.createComment({
              issue_number: context.issue.number,
              owner: context.repo.owner,
              repo: context.repo.repo,
              body: body
            });

      - name: Plan Status
        if: steps.plan.outcome == 'failure'
        run: exit 1
Workflow d'Apply (sur Merge)
# .github/workflows/terraform-apply.yml
name: "Terraform Apply"

on:
  push:
    branches: [main]
    paths:
      - 'environments/**'
      - 'modules/**'

permissions:
  contents: read
  id-token: write

jobs:
  terraform-apply-staging:
    name: "Apply - Staging"
    runs-on: ubuntu-latest
    environment: staging

    steps:
      - name: Checkout
        uses: actions/checkout@v4

      - name: Setup Terraform
        uses: hashicorp/setup-terraform@v3
        with:
          terraform_version: "1.7.0"

      - name: Configure AWS Credentials
        uses: aws-actions/configure-aws-credentials@v4
        with:
          role-to-assume: ${{ secrets.AWS_ROLE_ARN_STAGING }}
          aws-region: eu-west-3

      - name: Terraform Init
        run: terraform init -no-color
        working-directory: environments/staging

      - name: Terraform Plan
        run: terraform plan -no-color -out=tfplan
        working-directory: environments/staging

      - name: Terraform Apply
        run: terraform apply -no-color -auto-approve tfplan
        working-directory: environments/staging

  terraform-apply-production:
    name: "Apply - Production"
    needs: terraform-apply-staging
    runs-on: ubuntu-latest
    environment: production

    steps:
      - name: Checkout
        uses: actions/checkout@v4

      - name: Setup Terraform
        uses: hashicorp/setup-terraform@v3
        with:
          terraform_version: "1.7.0"

      - name: Configure AWS Credentials
        uses: aws-actions/configure-aws-credentials@v4
        with:
          role-to-assume: ${{ secrets.AWS_ROLE_ARN_PRODUCTION }}
          aws-region: eu-west-3

      - name: Terraform Init
        run: terraform init -no-color
        working-directory: environments/production

      - name: Terraform Plan
        id: plan
        run: terraform plan -no-color -out=tfplan -detailed-exitcode
        working-directory: environments/production
        continue-on-error: true

      - name: Terraform Apply
        if: steps.plan.outputs.exitcode == 2
        run: terraform apply -no-color -auto-approve tfplan
        working-directory: environments/production

      - name: Notify Success
        if: success()
        run: |
          curl -X POST "${{ secrets.SLACK_WEBHOOK }}" \
            -H "Content-Type: application/json" \
            -d '{
              "text": "Terraform Apply Production réussi",
              "blocks": [{
                "type": "section",
                "text": {
                  "type": "mrkdwn",
                  "text": "*Terraform Apply - Production*\nCommit: `${{ github.sha }}`\nAuteur: ${{ github.actor }}\nStatut: Succès"
                }
              }]
            }'

      - name: Notify Failure
        if: failure()
        run: |
          curl -X POST "${{ secrets.SLACK_WEBHOOK }}" \
            -H "Content-Type: application/json" \
            -d '{
              "text": "Terraform Apply Production échoué",
              "blocks": [{
                "type": "section",
                "text": {
                  "type": "mrkdwn",
                  "text": "*Terraform Apply - Production*\nCommit: `${{ github.sha }}`\nAuteur: ${{ github.actor }}\nStatut: ÉCHEC - Action requise!"
                }
              }]
            }'
GitLab CI pour Terraform
Si votre code est hébergé sur GitLab, voici l'équivalent du workflow complet en utilisant GitLab CI/CD.
Configuration GitLab CI
# .gitlab-ci.yml
stages:
  - validate
  - plan
  - apply

variables:
  TF_VERSION: "1.7.0"
  TF_ROOT: "environments/production"

image:
  name: hashicorp/terraform:${TF_VERSION}
  entrypoint: [""]

cache:
  key: "${CI_COMMIT_REF_SLUG}"
  paths:
    - ${TF_ROOT}/.terraform/

before_script:
  - cd ${TF_ROOT}
  - terraform init -no-color

# ---- Stage: Validate ----
fmt:
  stage: validate
  script:
    - terraform fmt -check -recursive -diff
  rules:
    - if: $CI_MERGE_REQUEST_IID
    - if: $CI_COMMIT_BRANCH == $CI_DEFAULT_BRANCH

validate:
  stage: validate
  script:
    - terraform validate -no-color
  rules:
    - if: $CI_MERGE_REQUEST_IID
    - if: $CI_COMMIT_BRANCH == $CI_DEFAULT_BRANCH

tflint:
  stage: validate
  image: ghcr.io/terraform-linters/tflint:latest
  before_script:
    - cd ${TF_ROOT}
    - tflint --init
  script:
    - tflint --format compact --no-color
  allow_failure: true
  rules:
    - if: $CI_MERGE_REQUEST_IID

security-scan:
  stage: validate
  image:
    name: bridgecrew/checkov:latest
    entrypoint: [""]
  before_script: []
  script:
    - checkov -d ${TF_ROOT} --framework terraform --quiet --compact
  allow_failure: true
  rules:
    - if: $CI_MERGE_REQUEST_IID

# ---- Stage: Plan ----
plan:
  stage: plan
  script:
    - terraform plan -no-color -out=tfplan
    - terraform show -no-color tfplan > plan.txt
  artifacts:
    paths:
      - ${TF_ROOT}/tfplan
      - ${TF_ROOT}/plan.txt
    reports:
      terraform: ${TF_ROOT}/plan.json
    expire_in: 7 days
  rules:
    - if: $CI_MERGE_REQUEST_IID
    - if: $CI_COMMIT_BRANCH == $CI_DEFAULT_BRANCH

# ---- Stage: Apply ----
apply:
  stage: apply
  script:
    - terraform apply -no-color -auto-approve tfplan
  dependencies:
    - plan
  rules:
    - if: $CI_COMMIT_BRANCH == $CI_DEFAULT_BRANCH
      when: manual
  environment:
    name: production
GitLab offre un avantage natif : l'intégration Terraform qui affiche le plan directement dans l'interface des Merge Requests, grâce à l'artifact terraform.
Gestion des Secrets dans la CI
La gestion des secrets est l'aspect le plus critique d'un pipeline Terraform. Voici les meilleures pratiques pour chaque plateforme.
OIDC : L'Approche Recommandée
Au lieu de stocker des clés d'accès statiques, utilisez OIDC (OpenID Connect) pour obtenir des credentials temporaires. Le CI/CD s'authentifie directement auprès du fournisseur cloud avec un token éphémère.
# Configuration AWS IAM pour OIDC avec GitHub Actions
resource "aws_iam_openid_connect_provider" "github" {
  url             = "https://token.actions.githubusercontent.com"
  client_id_list  = ["sts.amazonaws.com"]
  thumbprint_list = ["6938fd4d98bab03faadb97b34396831e3780aea1"]
}

resource "aws_iam_role" "github_actions_terraform" {
  name = "github-actions-terraform"

  assume_role_policy = jsonencode({
    Version = "2012-10-17"
    Statement = [
      {
        Effect = "Allow"
        Principal = {
          Federated = aws_iam_openid_connect_provider.github.arn
        }
        Action = "sts:AssumeRoleWithWebIdentity"
        Condition = {
          StringEquals = {
            "token.actions.githubusercontent.com:aud" = "sts.amazonaws.com"
          }
          StringLike = {
            "token.actions.githubusercontent.com:sub" = "repo:codeclan-fr/terraform-infra:*"
          }
        }
      }
    ]
  })
}

resource "aws_iam_role_policy_attachment" "terraform_admin" {
  role       = aws_iam_role.github_actions_terraform.name
  policy_arn = "arn:aws:iam::policy/AdministratorAccess"
  # En production, utilisez une politique plus restrictive !
}
Secrets GitHub Actions
Si OIDC n'est pas possible, stockez les secrets dans GitHub Settings :
- Repository Secrets : Accessibles à tous les workflows du dépôt.
- Environment Secrets : Limités à un environnement spécifique (staging, production).
- Organization Secrets : Partagés entre plusieurs dépôts.
Ne jamais afficher les secrets dans les logs. Utilisez ::add-mask:: si nécessaire, et vérifiez que vos commandes Terraform n'affichent pas de données sensibles dans leur sortie.
Tests Automatisés pour Terraform
Un pipeline CI/CD robuste intègre plusieurs niveaux de tests. Voici les outils indispensables, du plus rapide au plus complet.
Niveau 1 : Formatage et Validation (quelques secondes)
# Vérifier le formatage
terraform fmt -check -recursive -diff

# Valider la syntaxe et la cohérence
terraform init -backend=false
terraform validate
Niveau 2 : Linting avec TFLint (quelques secondes)
TFLint va au-delà de terraform validate en vérifiant les types d'instances valides, les bonnes pratiques du fournisseur cloud, et les règles personnalisées.
# .tflint.hcl
config {
  format = "compact"
  module = true
}

plugin "terraform" {
  enabled = true
  preset  = "recommended"
}

plugin "aws" {
  enabled = true
  version = "0.30.0"
  source  = "github.com/terraform-linters/tflint-ruleset-aws"
}

# Règle personnalisée : interdire les noms de ressource en camelCase
rule "terraform_naming_convention" {
  enabled = true
  format  = "snake_case"
}

# Interdire les modules locaux sans version
rule "terraform_module_pinned_source" {
  enabled = true
}
Niveau 3 : Scan de Sécurité avec Checkov (quelques secondes)
Checkov analyse votre code Terraform pour détecter des problèmes de sécurité et de conformité.
# Exécuter Checkov
checkov -d . --framework terraform --quiet

# Exemples de vérifications :
# - S3 bucket sans chiffrement activé
# - Security group ouvert à 0.0.0.0/0
# - RDS sans backup activé
# - CloudTrail non activé
# - IAM policy trop permissive (*)

# Ignorer des règles spécifiques (avec justification !)
checkov -d . --skip-check CKV_AWS_18,CKV_AWS_21
Niveau 4 : Tests d'Infrastructure avec Terratest (plusieurs minutes)
Terratest est un framework Go qui permet de tester vos modules Terraform en les déployant réellement dans un environnement éphémère.
// tests/vpc_test.go
package test

import (
    "testing"
    "github.com/gruntwork-io/terratest/modules/terraform"
    "github.com/gruntwork-io/terratest/modules/aws"
    "github.com/stretchr/testify/assert"
)

func TestVpcModule(t *testing.T) {
    t.Parallel()

    terraformOptions := terraform.WithDefaultRetryableErrors(t,
        &terraform.Options{
            TerraformDir: "../modules/networking",
            Vars: map[string]interface{}{
                "vpc_cidr":    "10.99.0.0/16",
                "environment": "test",
                "project":     "terratest",
            },
        },
    )

    // Nettoyer après le test
    defer terraform.Destroy(t, terraformOptions)

    // Déployer le module
    terraform.InitAndApply(t, terraformOptions)

    // Vérifier les outputs
    vpcId := terraform.Output(t, terraformOptions, "vpc_id")
    assert.NotEmpty(t, vpcId)

    // Vérifier que le VPC existe réellement dans AWS
    vpc := aws.GetVpcById(t, vpcId, "eu-west-3")
    assert.Equal(t, "10.99.0.0/16", vpc.CidrBlock)

    // Vérifier les tags
    assert.Equal(t, "test", vpc.Tags["Environment"])
}
Niveau 5 : Tests Natifs Terraform (à partir de v1.6)
Depuis la version 1.6, Terraform intègre un framework de test natif avec les fichiers .tftest.hcl.
# tests/vpc.tftest.hcl
variables {
  vpc_cidr    = "10.99.0.0/16"
  environment = "test"
  project     = "tftest"
}

run "create_vpc" {
  command = apply

  assert {
    condition     = aws_vpc.main.cidr_block == "10.99.0.0/16"
    error_message = "Le CIDR du VPC ne correspond pas"
  }

  assert {
    condition     = aws_vpc.main.tags["Environment"] == "test"
    error_message = "Le tag Environment est incorrect"
  }
}

run "verify_subnets" {
  command = apply

  assert {
    condition     = length(aws_subnet.private) == 3
    error_message = "Il devrait y avoir 3 subnets privés"
  }
}
Stratégie de Branches
La stratégie de branches pour l'Infrastructure as Code diffère légèrement de celle du code applicatif. Voici l'approche recommandée.
Trunk-Based Development (Recommandé)
# Flux recommandé pour l'IaC
#
# main (branche protégée)
#   │
#   ├── feature/add-rds-cluster     (PR → plan auto → review → merge → apply)
#   ├── feature/update-vpc-peering  (PR → plan auto → review → merge → apply)
#   └── fix/security-group-rules    (PR → plan auto → review → merge → apply)
#
# Règles :
# - Pas de commit direct sur main
# - Chaque PR déclenche un plan automatique
# - Au moins 1 approbation requise
# - Le plan doit passer sans erreur
# - Les tests de sécurité doivent passer
# - Apply automatique après merge (staging) ou manuel (production)
Protection de Branche
Configurez les protections suivantes sur votre branche main :
- Pull Request obligatoire avec au moins un approbateur.
- Les status checks CI doivent passer (plan, validate, lint, security).
- La branche doit être à jour avec main avant le merge.
- Interdire le force push et la suppression.
Approval Gates : Contrôler les Déploiements
Pour la production, il est crucial d'avoir des gates d'approbation manuelle. Voici comment les configurer.
GitHub Environments
GitHub Environments permettent de définir des règles de déploiement par environnement :
- Reviewers requis : Spécifiez les personnes ou équipes qui doivent approuver.
- Timer d'attente : Imposez un délai minimum entre le plan et l'apply.
- Restriction de branches : Seule la branche main peut déployer en production.
Dans le workflow YAML, référencez l'environnement avec le mot-clé environment:. GitHub pausera automatiquement le workflow en attendant l'approbation.
GitLab : Approbation Manuelle
Dans GitLab, utilisez when: manual combiné avec des environnements protégés pour obtenir un résultat similaire. Les environnements protégés dans GitLab permettent de restreindre qui peut déclencher un déploiement.
Notifications et Observabilité
Un bon pipeline informe l'équipe de son état à chaque étape importante.
Notifications Slack
# Étape de notification dans GitHub Actions
- name: Notify Slack on Plan
  if: always()
  uses: slackapi/slack-github-action@v1
  with:
    payload: |
      {
        "channel": "#infra-deploys",
        "text": "Terraform Plan pour ${{ matrix.environment }}",
        "attachments": [{
          "color": "${{ job.status == 'success' && '#36a64f' || '#ff0000' }}",
          "fields": [
            {"title": "Environnement", "value": "${{ matrix.environment }}", "short": true},
            {"title": "Statut", "value": "${{ job.status }}", "short": true},
            {"title": "Auteur", "value": "${{ github.actor }}", "short": true},
            {"title": "PR", "value": "#${{ github.event.number }}", "short": true}
          ]
        }]
      }
  env:
    SLACK_WEBHOOK_URL: ${{ secrets.SLACK_WEBHOOK }}
Commentaires Automatiques dans les PRs
Le workflow GitHub Actions présenté plus haut inclut déjà la publication du plan en commentaire dans la PR. Cela permet à toute l'équipe de voir exactement quelles ressources seront créées, modifiées ou détruites avant de donner son approbation.
Bonnes Pratiques Avancées
Verrouillage du State
Assurez-vous que votre backend supporte le verrouillage du state pour éviter les exécutions concurrentes. S3 avec DynamoDB, GCS, Azure Blob et Terraform Cloud supportent tous le locking nativement.
Utilisation de terraform plan -out
Toujours sauvegarder le plan avec -out=tfplan et l'utiliser pour l'apply. Cela garantit que ce qui a été revu est exactement ce qui est appliqué, même si l'état de l'infrastructure a changé entre le plan et l'apply.
Versions Fixées
# Toujours fixer les versions dans le pipeline
terraform {
  required_version = "= 1.7.0"  # Version exacte, pas ~>

  required_providers {
    aws = {
      source  = "hashicorp/aws"
      version = "= 5.31.0"
    }
  }
}

# Utiliser un fichier .terraform-version pour les outils comme tfenv
# .terraform-version
# 1.7.0
Drift Detection
Programmez une exécution régulière de terraform plan (par exemple quotidienne) pour détecter les dérives de configuration, c'est-à-dire les modifications manuelles faites en dehors de Terraform.
# .github/workflows/drift-detection.yml
name: "Drift Detection"

on:
  schedule:
    - cron: '0 8 * * 1-5'  # Tous les jours ouvrés à 8h

jobs:
  drift-check:
    name: "Check Drift - ${{ matrix.environment }}"
    runs-on: ubuntu-latest
    strategy:
      matrix:
        environment: [staging, production]
    steps:
      - uses: actions/checkout@v4
      - uses: hashicorp/setup-terraform@v3
        with:
          terraform_version: "1.7.0"

      - name: Configure AWS
        uses: aws-actions/configure-aws-credentials@v4
        with:
          role-to-assume: ${{ secrets.AWS_ROLE_ARN }}
          aws-region: eu-west-3

      - name: Check Drift
        id: drift
        run: |
          cd environments/${{ matrix.environment }}
          terraform init -no-color
          terraform plan -no-color -detailed-exitcode
        continue-on-error: true

      - name: Alert on Drift
        if: steps.drift.outcome == 'failure'
        run: |
          curl -X POST "${{ secrets.SLACK_WEBHOOK }}" \
            -H "Content-Type: application/json" \
            -d '{"text": "Drift détecté en ${{ matrix.environment }} ! Vérifiez le pipeline."}'
Conclusion
Automatiser Terraform avec un pipeline CI/CD n'est pas un luxe, c'est une nécessité dès que vous travaillez en équipe ou que vous gérez des environnements critiques. Le workflow présenté dans cet article — plan sur PR, review, apply sur merge avec approval gates — est le standard de l'industrie et a fait ses preuves dans des organisations de toutes tailles.
Commencez par le plus simple : un workflow qui exécute terraform fmt, validate et plan sur les Pull Requests. Puis ajoutez progressivement le linting, les scans de sécurité, les tests automatisés et les notifications. L'important est de démarrer et d'itérer.
Dans le prochain article, nous comparerons Terraform et Ansible pour comprendre leurs forces, faiblesses et complémentarités respectives. Restez connectés sur CodeClan !